

Most marketers use Google Tag Manager the same way. Paste the snippet a developer sent, copy a tag from a blog post, hit publish, hope for the best. It works until it doesn’t. Then a Purchase event fires twice, GA4 shows zero form submissions, and Meta reports half the conversions your backend recorded. Nobody can explain why.
This Google Tag Manager cheatsheet fixes that. It’s the written companion to our “Master Google Tag Manager in 7 Days” carousel, expanded with the tables, code snippets and debugging steps that don’t fit on a slide. Follow it in order and you’ll go from installing GTM on a test site to sending the same events through the Meta Pixel and the Meta Conversions API (CAPI).
Each section maps to one day of the plan. You get the definition, the exact setup steps, a quick-reference table you can screenshot, and the mistake that catches most people on that topic.
You don’t need to code. A little JavaScript shows up on Day 3, and every snippet is copy-paste.
Table of Contents
What Is Google Tag Manager and How Does It Work?
Day 1: Understand GTM
Google Tag Manager (GTM) is a free tag management system that lets you add and update tracking code on your website without editing the site’s source code each time. You install one container snippet once, then manage every tag from the GTM interface.
Here’s why that matters. A D2C brand like Mamaearth would typically run analytics, Meta Ads, Google Ads remarketing and probably a heatmap tool on the same site. Without GTM, each one is a separate script pasted into the code. Every change becomes a developer ticket, and every ticket takes days.
With GTM, marketing owns the changes. Developers install the container once and step away.
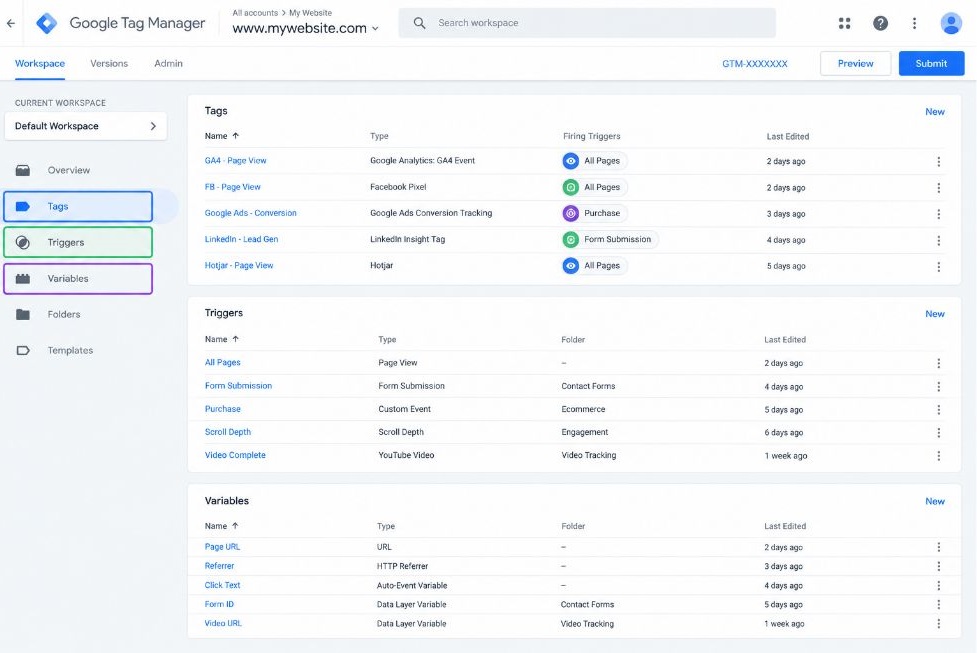
Tags, Triggers and Variables
Everything in GTM comes down to three building blocks.
A tag is a snippet of code that sends data to another tool, such as GA4 or the Meta Pixel. A trigger is a rule that tells a tag when to fire. A variable is a piece of data GTM reads, such as a page URL, the text of a clicked button or a value from your data layer.
Think of it as what, when and which data.
| Building block | Question it answers | Example |
| Tag | What should GTM do? | Send a generate_lead event to GA4 |
| Trigger | When should it happen? | When the contact form is submitted |
| Variable | Which data should it use? | The form ID, or the page path |
Most tracking problems are a mismatch between these three. The tag is fine, the trigger is too broad, and the variable returns undefined. Keep that in mind, because it’s the core of Day 6.
Containers, Workspaces, Preview Mode and Publish vs Save
A container is the box that holds all the tags, triggers and variables for one website. You install one container snippet per site, and everything inside it loads from that one snippet.
A workspace is a working copy of the container. Several people can edit different workspaces without overwriting each other, and the changes merge when someone publishes.
Preview mode opens Tag Assistant and shows you exactly which tags fired on your site, in what order, before anything goes live. Never publish without it.
Now the one that trips up beginners: Save is not Publish. Saving stores your changes inside the workspace only. Nothing reaches your live site until you click Submit, name the version and publish it. So if a tag works in Preview and does nothing on the live site, you probably forgot this step.
Google Tag Manager is a free tag management system built on three parts: tags (what to do), triggers (when to do it) and variables (which data to use). Changes made in a GTM workspace stay private until a version is submitted and published, which is why Preview mode should always come before Publish.
Practice: Install GTM on a test website. The next section shows how.
How Do You Install GTM on a Website?
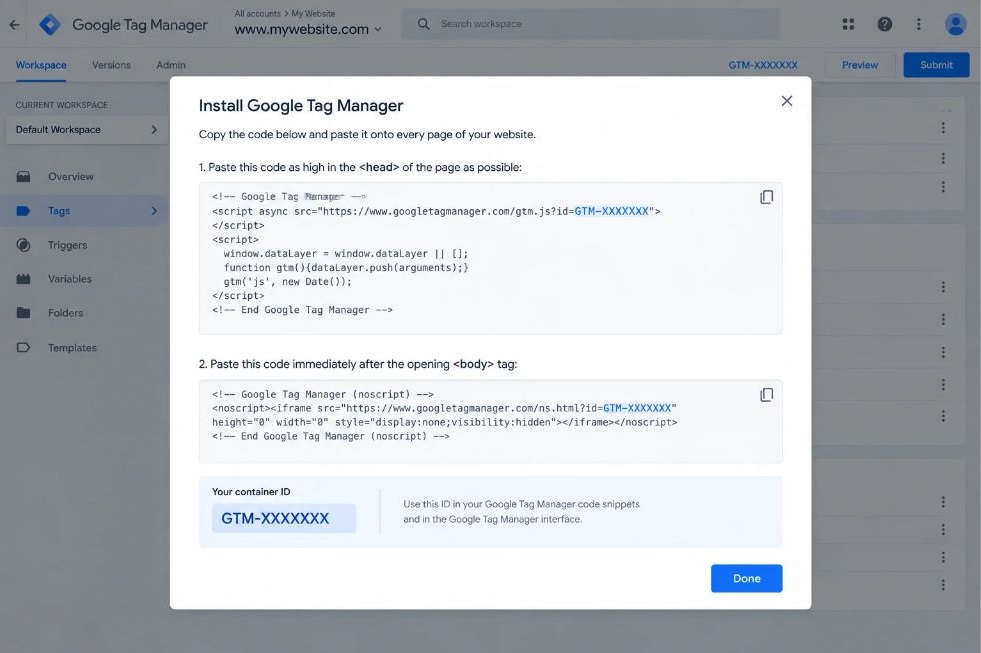
You install GTM by creating a container at tagmanager.google.com and pasting two code snippets into your site: one in the <head> and one immediately after the opening <body> tag.
The whole thing takes about ten minutes. Here are the steps.
- Create the account. Go to tagmanager.google.com and click Create Account. Use your company name as the account name.
- Create the container. Enter your domain as the container name and select Web as the target platform.
- Copy the snippets. GTM shows two code blocks and a container ID that looks like GTM-XXXXXXX.
- Paste the first snippet as high in the <head> of every page as possible.
- Paste the second snippet (the noscript block) immediately after the opening <body> tag.
- Click Preview in GTM, enter your site URL and let Tag Assistant connect.
- Confirm the container loaded. You should see “Container Loaded” in the event list on the left of Tag Assistant.
Most CMS platforms make this easier. On WordPress, plugins such as Site Kit by Google or GTM4WP paste the snippets for you. On Shopify, the head snippet goes into the theme file, but checkout pages don’t accept theme code. Purchase tracking there needs Shopify’s Customer events (custom pixels) or a dedicated app.
That’s a real limitation, and it’s the reason many Shopify stores end up with GTM working perfectly everywhere except the one page that matters.
Two mistakes to avoid. Installing the container twice (once by a plugin, once by hand) doubles every event. And testing on the live site first instead of a staging or test site is how you end up with broken data in production.
Practice: Install GTM on a test website and confirm “Container Loaded” in Preview mode.
How Do You Track Button Clicks, Forms, Scrolls, Videos and Page Views?
Day 2: Track user actions
You track any user action in GTM with the same chain: the user does something, a trigger detects it, and a tag sends the data to a tool such as GA4. Click → Trigger → Tag → Data.
Take an Add to Bag button on a store like Nykaa. The click is the action. A Click trigger listens for it, filtered to that one button. A GA4 Event tag then sends add_to_cart to your analytics. Same logic applies to every action below.
One setup step first. Before building click or form triggers, go to Variables, click Configure and enable the built-in variables you need (Click ID, Click Classes, Click Text, Click URL, Form ID and so on). They’re switched off by default, and it’s the number one reason beginners can’t find a variable in the dropdown.
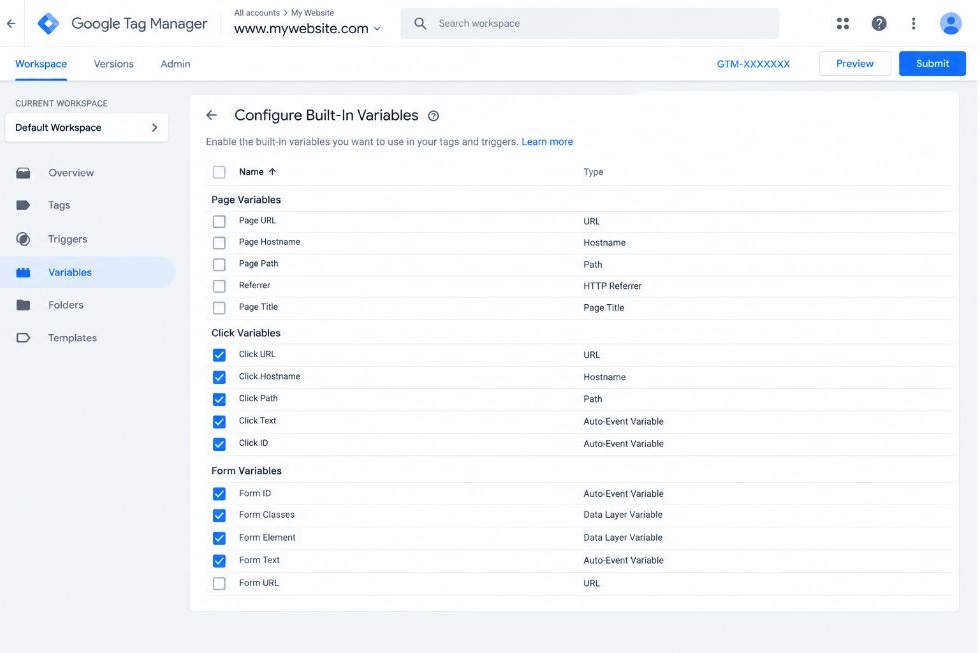
The action-to-trigger cheatsheet
| User action | Trigger type | Built-in variables to enable |
| Button click | Click: All Elements | Click ID, Click Classes, Click Text |
| Link click | Click: Just Links | Click URL, Click Text |
| Form submission | Form Submission | Form ID, Form Classes, Form Text |
| Scroll depth | Scroll Depth | Scroll Depth Threshold, Scroll Depth Units |
| Video engagement | YouTube Video | Video Title, Video Percent, Video Status |
| Page view | Page View | Page URL, Page Path, Page Hostname |
A few things this table doesn’t tell you.
Filter click triggers as tightly as you can. “Click: All Elements” with no conditions fires on every click on the site. Add a condition on Click ID or a CSS selector so the tag only fires for your target button. Avoid conditions on Click Text where you can, because copy changes with every A/B test.
Form triggers break on AJAX forms, which submit without reloading the page. GTM’s Form Submission trigger often can’t see them. If your trigger never fires, either track the thank-you page view, watch for the success message with an Element Visibility trigger, or ask a developer for a data layer push (Day 3).
And check what GA4 already does for you. GA4’s enhanced measurement automatically tracks scrolls (at 90% depth), outbound clicks, file downloads, site search and embedded YouTube video engagement. If you build your own 25/50/75/100% scroll tracking in GTM, turn off enhanced scroll in GA4, or you’ll count scrolls twice.
Practice: Track five important actions on a website. Good starting five: your primary call-to-action button, a tel: phone link click, the contact form submission, 75% scroll on your best blog post and an outbound link click.

How Does the Data Layer Work in GTM?
Day 3: Master the data layer
Click triggers are fragile. A designer renames a CSS class, and your tracking dies without a single error message.
The data layer is a JavaScript array named dataLayer that your website uses to pass structured information to GTM. Because your site pushes the data on purpose, it doesn’t break when the page design changes. It’s the most reliable way to track anything important, which is why every serious ecommerce setup runs on it.
Custom events and event parameters
A custom event is an event name your developer pushes into the data layer when something meaningful happens. An event parameter is an extra detail attached to that event, such as which form was submitted.
Here’s a lead form push:
<script>
window.dataLayer = window.dataLayer || [];
window.dataLayer.push({
event: ‘generate_lead’,
form_name: ‘contact_us’,
form_location: ‘footer’
});
</script>
To use it in GTM, create a Custom Event trigger with the event name generate_lead. Then create two Data Layer Variables, one for form_name and one for form_location. Attach the trigger and variables to a GA4 Event tag.
The event name in the trigger must match the pushed name exactly, including case. Generate_Lead will not match generate_lead. Stick to snake_case throughout, since GA4’s own recommended events use it.
Ecommerce data and Data Layer variables
Ecommerce tracking works the same way, with a structured ecommerce object holding the product details. Here’s an add-to-cart push:
<script>
window.dataLayer = window.dataLayer || [];
dataLayer.push({ ecommerce: null }); // clear the previous ecommerce object
dataLayer.push({
event: ‘add_to_cart’,
ecommerce: {
currency: ‘INR’,
value: 1299,
items: [{
item_id: ‘SKU_1042’,
item_name: ‘Wireless Earbuds’,
price: 1299,
quantity: 1
}]
}
});
</script>
Notice the first line inside the push sequence: ecommerce: null. It clears the previous ecommerce object so old product data doesn’t bleed into the next event. Skipping it is a classic cause of wrong item data in GA4 reports.
A Data Layer Variable is a GTM variable that reads a named value from the data layer, such as form_name or ecommerce.value. For ecommerce, you often don’t need individual variables at all. In the GA4 Event tag you tick “Send Ecommerce data” and choose Data Layer as the source, and GTM forwards the whole object.
The data layer is a JavaScript array that passes structured data from your website to Google Tag Manager. It’s more reliable than click or CSS-based triggers because the site pushes the data deliberately, so design changes don’t break tracking. Custom events use snake_case names, and ecommerce pushes should clear the previous ecommerce object first.
If you’re planning to hand snippets to a developer, give them the exact event names and parameter names in a spreadsheet. Vague requests like “track purchases” produce vague implementations.
Practice: Track one event with custom parameters, end to end: push it, catch it with a Custom Event trigger and see the parameters in Preview mode.
How Do You Set Up GA4 With GTM?
Day 4: GA4 + GTM
You set up GA4 with GTM by creating one Google tag that loads GA4 on every page, then adding a GA4 Event tag for each action you want to measure. Website → GTM → GA4 is the entire pipeline.
Here are the steps in the order that avoids most rework.
- Create the Google tag. In GTM, go to Tags → New → Google tag. Enter your GA4 Measurement ID (it starts with G-). Set the trigger to Initialization: All Pages. You’ll see older tutorials call this the “GA4 Configuration” tag. Same job, new name.
- Create a GA4 Event tag for each custom event. Tag type: Google Analytics: GA4 Event. Enter the same Measurement ID and the event name, for example generate_lead.
- Add event parameters. Under Event Parameters, add rows such as form_name with the value set to your Data Layer Variable. GA4 event names can be up to 40 characters, and each event can carry up to 25 parameters.
- Add user properties where useful. A user property describes the person rather than the action, like customer_type: returning. Add these in the User Properties section of the tag.
- Register custom dimensions in GA4. Go to Admin → Custom definitions and create a dimension for each parameter or user property you want in reports. Skip this and your parameters arrive in GA4 but never show up in standard reports or Explorations.
- Mark key events. In GA4, go to Admin → Events and toggle “Mark as key event” for the events that matter, like generate_lead and purchase. Google renamed “conversions” to “key events” in GA4 in March 2024, so older guides use the old term.
- Set up ecommerce events. Use GA4’s recommended names: view_item, add_to_cart, begin_checkout and purchase. Always send a unique transaction_id with purchase, because GA4 uses it to prevent duplicate orders.
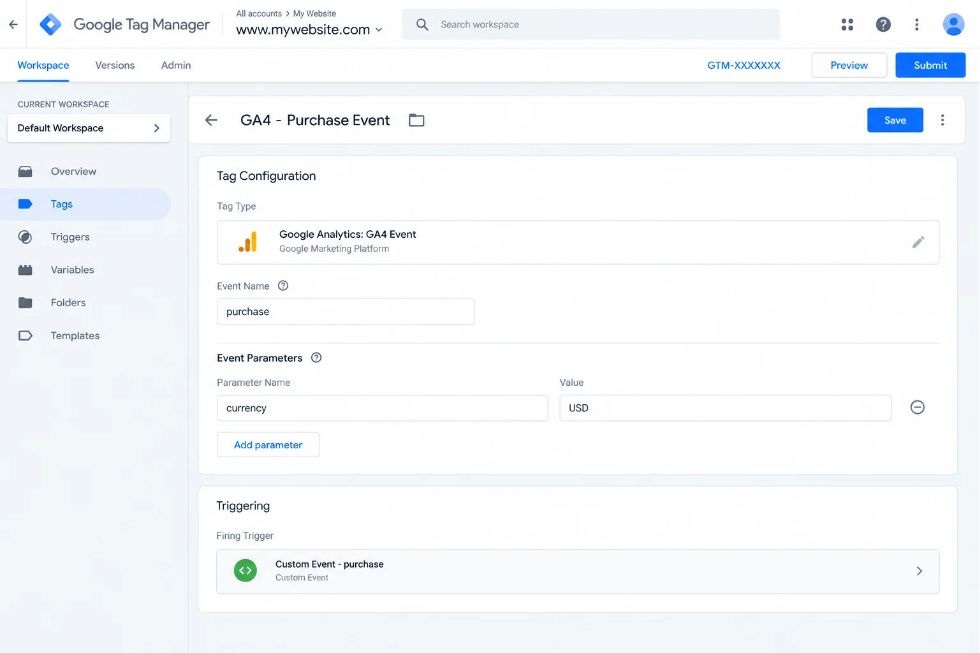
Before you call this done, open GA4 DebugView (Admin → DebugView) while Preview mode is running. Every event you fire on your test site should appear there within seconds, with its parameters attached. If it shows up in Preview but not in DebugView, jump ahead to the debugging section.
One limitation worth knowing: GA4 only starts recording a custom dimension from the moment you register it. It doesn’t backfill. So register your dimensions before launch, not after the first month of data.
Practice: Build a complete Website → GTM → GA4 setup with at least one custom event, one event parameter and one key event.
How Do You Set Up the Meta Pixel With GTM?
Day 5: Meta Pixel + GTM
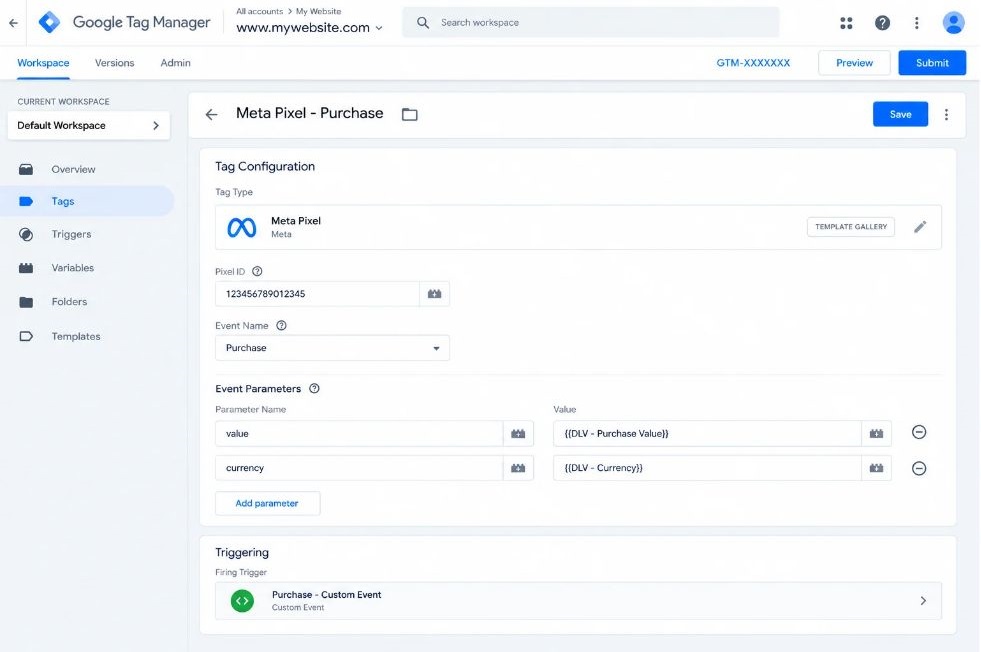
The Meta Pixel is a snippet that sends browser events, such as page views and purchases, to Meta so you can measure and optimise your ads. In GTM you install the base code once on all pages, then add one tag per event.
You have two ways to add the base code. You can use a Custom HTML tag with the code from Meta Events Manager, or use Meta’s official Pixel template from GTM’s Community Template Gallery. The template is cleaner for beginners, since it gives you fields instead of raw code.
- Copy your Pixel ID from Meta Events Manager.
- Create a tag in GTM using the Meta Pixel template or a Custom HTML tag.
- Set the base tag to fire on All Pages. It sends PageView.
- Create one tag per event (ViewContent, Lead, AddToCart, Purchase), each with its own trigger.
- Pass parameters from your data layer variables so Meta gets value, currency and product IDs.
- Test in Meta Events Manager before publishing.
The standard events cheatsheet
| Event | When it fires | Parameters worth sending |
| PageView | Every page load (base code) | None needed |
| ViewContent | Product or service page view | content_ids, content_type, content_name, value, currency |
| Lead | Form submission | content_name, value, currency |
| AddToCart | Add-to-cart click | content_ids, content_type, value, currency |
| Purchase | Order confirmation | value and currency (both required), content_ids, num_items |
Here’s what a Purchase event looks like in raw Pixel code, useful when you’re checking what your tag should send:
<script>
fbq(‘track’, ‘Purchase’, {
value: 1299,
currency: ‘INR’,
content_ids: [‘SKU_1042’],
content_type: ‘product’
});
</script>
Purchase without value and currency is the most common Meta setup error. The event still records, but Meta can’t calculate return on ad spend, and your value-based optimisation has nothing to learn from.
To test, open Events Manager, choose your Pixel, and go to the Test Events tab. Enter your site URL, open it, and perform the action. Events should appear live. Install the Meta Pixel Helper Chrome extension as a second check, since it shows which pixels fired on any page and flags errors.
Watch for duplicate PageViews. If a developer or plugin already hard-coded the Pixel and you add it again in GTM, every page view counts twice. Pick one place to load the Pixel and remove the other.
Also learn: how to read the Test Events tab. Green ticks and correct parameters mean you’re done. Warnings mean read them, because they’re specific.
How Do You Debug GTM Tracking When Something Breaks?
Day 6: Master debugging
Debugging GTM means checking each link in the chain in order: did the event happen, did the trigger match, did the tag fire, did the request leave the browser, and did the platform receive it. Whichever link fails first is your problem.
Most people skip straight to the last link and stare at GA4 reports for an hour. Work left to right instead.
The debugging toolkit
| Tool | What it tells you | Use it when |
| GTM Preview mode | Which tags fired, which didn’t, and why | Always, first |
| Tag Assistant | The same data in a browser-based session, plus Google tag diagnostics | Checking Google tags across a site |
| Browser Developer Tools (Network tab) | Whether the request actually left the browser | Preview says fired, platform shows nothing |
| GA4 DebugView | Events as GA4 receives them, with parameters | Checking GA4 received the right data |
| Meta Events Manager (Test Events) | Events as Meta receives them | Checking Pixel and CAPI events |
| Network requests | The raw payload sent | Confirming parameter values |
For Network requests, open Developer Tools, go to the Network tab and filter by collect to see GA4 requests, or facebook.com/tr for Meta Pixel requests. Click a request and read the payload. If the value you expect isn’t in there, the problem is upstream in your variable.
The five problems you’ll actually meet
| Symptom | Likely cause | Fix |
| Tag not firing | Trigger conditions not met, or the event never reached the data layer | Open the tag in Preview and read “Why didn’t this tag fire?” Then check each condition |
| Wrong trigger | Trigger too broad (fires on every click) or too narrow (typo in event name) | Tighten or correct the trigger conditions, then re-test |
| Missing variable | Built-in variable not enabled, or the data layer key is misspelled | Check Variables → Configure. Compare the variable’s data layer name with the actual push |
| Wrong parameter | Variable returns undefined, an old value or the wrong format | Look at the Variables tab in Preview at the moment the tag fired |
| Duplicate event | Tag fires twice, container installed twice, or hard-coded and GTM both fire | Check for two containers, overlapping triggers and enhanced measurement overlap |
The most useful habit here: in Preview mode, click the specific event in the left panel, then check the Tags tab and the Variables tab for that moment. Variables change as the page changes, so the values you see on the summary view may not be the values that existed when your tag fired.
Two causes of “it works in Preview but not live”. First, you never published (see Day 1). Second, consent settings or an ad blocker are stopping the tag on the live site but not in your debug session. Test in an incognito window with your extensions disabled.
To debug Google Tag Manager, check the tracking chain in order: whether the event happened, whether the trigger matched, whether the tag fired, whether the request left the browser and whether the platform received it. GTM Preview mode, the browser’s Network tab, GA4 DebugView and Meta Events Manager each verify a different link in that chain.
Practice: Break something on purpose. Rename a trigger’s event name, watch the tag stop firing in Preview, then fix it. You’ll diagnose real problems faster once you’ve seen a fake one.
How Does Meta CAPI Work Alongside the Pixel?
Day 7: Set up Meta CAPI
The Meta Conversions API (CAPI) sends conversion events from your server to Meta instead of relying on the visitor’s browser. Running it alongside the Pixel gives Meta a second path to the same events, which matters when ad blockers or browser privacy settings stop the Pixel from firing.
Notice the word “alongside”. CAPI doesn’t replace the Pixel for most setups. Meta’s own guidance is to send events through both, and let Meta work out which copies are the same.
Which brings us to the hard part.
Browser vs server events and deduplication
A browser event is sent by the Pixel from the visitor’s browser. A server event is sent by your server (or a server-side GTM container) directly to Meta.
If both send the same Purchase, Meta could count it twice. Event deduplication is the process Meta uses to recognise that a browser event and a server event describe the same action and keep only one. It works by matching the event_name and event_id on both copies. According to Meta’s Conversions API documentation, Meta deduplicates matching events received within 48 hours of each other.
So the rule is simple. Generate one unique ID per action (an order ID works well for purchases), and send that same value from both sides.
In the browser, the Pixel accepts it as a fourth argument:
<script>
fbq(‘track’, ‘Purchase’,
{ value: 1299, currency: ‘INR’ },
{ eventID: ‘order_10482’ }
);
</script>
The server event carries the same value in its event_id field. Different IDs, or a missing one on either side, and you get double-counted purchases.
Event Match Quality, access tokens and server-side parameters
Event Match Quality (EMQ) is a score from 0 to 10 in Meta Events Manager that shows how well the customer information in your events can be matched to Meta accounts. Higher scores generally mean better attribution and ad optimisation.
Server events can carry more customer data than the Pixel, and that’s where the score improves. The parameters that matter most:
- Email (em) and phone (ph), hashed with SHA-256 before sending
- Click ID (fbc) and browser ID (fbp), which come from cookies and are sent as they are
- Client IP address and user agent
- An external_id, such as your own customer ID, hashed
Beyond those, every server event needs event_name, event_time, event_id, event_source_url and action_source (set to website for web events).
Then there’s the access token, the credential that authorises your server to send events to your Pixel. Generate it in Events Manager under Settings, in the Conversions API section. Treat it like a password. Anyone who has it can send events to your dataset.
How to actually set it up
Your flow is Website → GTM → Meta Pixel → CAPI → Meta. There are three practical routes:
- Server-side GTM. You create a server container, host it (Google Cloud or a managed host such as Stape), and add Meta’s Conversions API tag template inside it. The browser sends events to your server container, which forwards them to Meta. This is the most flexible route.
- Conversions API Gateway. A Meta-provided option that sets up the server connection with less manual work.
- Platform integrations. Shopify, for example, has native Conversions API support through its Meta sales channel. If you’re on a supported platform, check this first.
Be honest with yourself about the costs. Server-side GTM usually means paid hosting, and it adds maintenance. Consent rules also don’t disappear because an event moved to the server: GDPR, and India’s Digital Personal Data Protection Act, 2023, still apply to how you collect and share customer data. And CAPI won’t recover every lost conversion. It narrows the gap. It doesn’t close it.
Meta Conversions API (CAPI) sends conversion events from a server directly to Meta, giving advertisers a second data path alongside the browser Pixel. Meta deduplicates browser and server events using a matching event_name and event_id, so both should send the same unique ID for each action. Event Match Quality, scored 0 to 10, improves when server events include hashed customer data such as email and phone.
Goal: Send the same important events (Lead, Purchase) through both browser and server, with a matching event_id, and confirm in Events Manager that they’re deduplicated.
What Does the 7-Day Google Tag Manager Cheatsheet Look Like?
The plan is seven short days, each with one practice task. Here’s the whole thing on a single table. Screenshot it.
| Day | Focus | Practice task | Done when |
| 1 | Understand GTM | Install GTM on a test website | “Container Loaded” shows in Preview |
| 2 | Track user actions | Track 5 important actions | All 5 tags fire in Preview |
| 3 | Master the data layer | Track an event with custom parameters | Parameters appear in the Variables tab |
| 4 | GA4 + GTM | Build Website → GTM → GA4 | Events and parameters appear in DebugView |
| 5 | Meta Pixel + GTM | Set up PageView, ViewContent, Lead, AddToCart, Purchase | Events pass in Test Events |
| 6 | Master debugging | Break and fix a tag on purpose | You can name the failing link in the chain |
| 7 | Meta CAPI | Send Lead and Purchase via browser and server | Events show as deduplicated in Events Manager |
A note on pace. Seven days is realistic if you give each day an hour or two and practise on a test site. It’s not realistic if you try to do it while managing live client accounts. Give yourself the sandbox first.
From what we’ve seen with YUP course learners, the days that take longest are Day 3 and Day 7. The data layer feels abstract until you see it in Preview mode, and CAPI has more moving parts than everything before it combined. Budget extra time for both.
Conclusion
Three ideas carry most of this cheatsheet. Every GTM setup is tags, triggers and variables, and most bugs are a mismatch between them. The data layer beats click-scraping for anything you can’t afford to lose. And debugging is a method, not a talent: check the chain in order, from the event to the platform.
The seven-day plan works because each day builds one working piece and ends with something you can verify. Don’t move to Day 5 until Day 4’s events show up in DebugView.
Your next step is small. Open a test site, install the container, and get to “Container Loaded” in Preview mode. Everything else in this guide builds on that one green tick.
If you want to go from a working setup to reading the data properly, the Analytics course at Young Urban Project covers GA4 reporting, attribution and the measurement decisions that sit on top of clean tracking. GTM gets the data in. The course teaches you what to do with it.
FAQ
What is Google Tag Manager used for?
Google Tag Manager is used to add, edit and manage tracking tags on a website without changing the site’s code each time. Marketers use it to send data to tools like GA4, Meta Pixel, Google Ads and LinkedIn Insight Tag. You set up tags, triggers and variables in one interface and publish changes yourself.
Is Google Tag Manager the same as Google Analytics?
No. Google Tag Manager collects and sends data. Google Analytics 4 (GA4) receives, stores and reports it. GTM is the delivery layer, GA4 is one of the places the data can be delivered. You can use GA4 without GTM, but GTM makes complex tracking far easier to manage.
Is GTM free?
Yes. The standard version of Google Tag Manager is free. Google also sells Tag Manager 360, a paid version for enterprises with extra support and governance features. Most marketers and small businesses never need it. Server-side GTM has hosting costs, though, because you run the server container on cloud infrastructure.
Do I need to know how to code to use GTM?
Not for the basics. Page views, link clicks, button clicks and scroll depth all work with point-and-click triggers. You’ll need a little JavaScript, or a developer, for data layer pushes and ecommerce tracking. The snippets in this cheatsheet cover the most common cases.
Can you really learn Google Tag Manager in 7 days?
You can learn the fundamentals and build a working setup, yes. Seven days gets you through installation, tracking user actions, the data layer, GA4, the Meta Pixel, debugging and CAPI on a test site. Real expertise comes from repeated work on live sites with messy edge cases, which takes longer.
Why isn’t my GTM tag firing?
Open Preview mode, click the event where the tag should have fired and read the “Why didn’t this tag fire?” explanation. The usual causes are a trigger condition that isn’t met, a misspelled event name, a built-in variable that isn’t enabled, or a container that was saved but never published. Check them in that order.
Why are my GA4 events showing up twice?
Duplicates usually come from one of four sources: the GTM container installed twice, GA4 hard-coded on the site as well as in GTM, overlapping triggers on the same tag, or enhanced measurement tracking the same action your custom tag tracks. Preview mode shows you which tags fire on each event, so you can spot the double fire quickly.
What’s the difference between the Meta Pixel and the Conversions API?
The Meta Pixel sends events from the visitor’s browser. The Conversions API sends events from your server. The Pixel is easier to set up but can be blocked by browsers and extensions. CAPI is harder to set up but isn’t affected by those blocks, and it can carry more customer data for matching.
Do I need both the Pixel and CAPI?
Meta recommends using both, and for advertisers running conversion campaigns that’s usually the right call. The Pixel captures browser signals, CAPI adds server-side reliability, and deduplication merges the two. If you only run a small volume of ads, a well-configured Pixel alone may be enough for now. Add CAPI when conversion volume or attribution accuracy starts to matter.
What is event deduplication in Meta?
Event deduplication is how Meta recognises that a browser event and a server event describe the same action and counts it once. It works by matching the event_name and event_id sent from both sides. If the IDs differ or one is missing, Meta may count the action twice and inflate your conversion numbers.
Do I need server-side GTM to use Meta CAPI?
No. Server-side GTM is one route, and the most flexible one. You can also use Meta’s Conversions API Gateway or a platform integration such as Shopify’s native support. Choose based on your platform, budget and how much control over the data you need.