

Your developers pushed a CSS update at 4 PM on a Friday. Functional tests passed. The deployment went through. And by Monday morning, a button on your checkout page had shifted 40 pixels to the left -invisible to any automated test that only checks whether the button exists, not where it actually sits on the screen.
That’s the exact problem visual testing tools are built to catch. And as teams ship faster, maintain larger component libraries, and deal with AI-generated frontend code that none of them fully wrote, the gap between “tests passing” and “UI looking right” keeps growing.
Visual testing tools close that gap by comparing how your interface actually renders -across browsers, devices, and screen sizes -against a known-good baseline. This article covers 15 of the best visual testing tools available in 2026, how they differ, and how to pick the right one for your team.
Table of Contents
What Is Visual Testing?
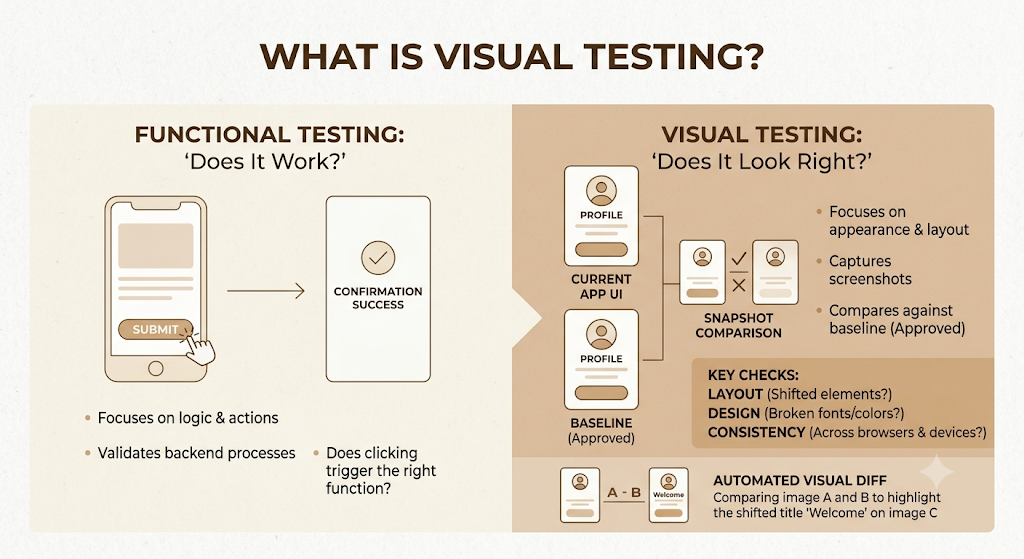
Visual testing is the process of validating that an application’s user interface looks the way it’s supposed to -not just that it functions correctly, but that it renders correctly.
Where functional tests ask “does clicking this button trigger the right action?”, visual testing asks “does this button look right, sit in the right place, and appear consistently across every browser and screen size?”
It works by capturing screenshots of UI elements or full pages, then comparing those screenshots against a previously approved baseline. Any difference -a shifted layout, a broken font, a missing element, an unexpected colour change -shows up as a visual diff.
Visual testing can be manual (a designer reviews screenshots by eye) or automated (a tool does the comparison programmatically). In modern CI/CD workflows, automated visual testing is standard.
Visual testing is the practice of validating how a user interface renders on screen, distinct from functional testing which only checks behaviour. It catches layout shifts, broken fonts, colour regressions, and element misalignments that pass functional checks. Automated visual testing tools compare new screenshots against approved baselines and flag differences for human review.
Visual Testing vs Visual Regression Testing -What’s the Difference?
These two terms get used interchangeably. They’re not quite the same thing, but the distinction is narrow.
| Visual Testing | Visual Regression Testing | |
| Purpose | Validate overall UI appearance and consistency | Detect UI changes introduced by code updates |
| Scope | Design QA, cross-browser checks, initial launch | Ongoing checks after every code change or deployment |
| When Used | Design handoff, new feature releases, redesigns | Every pull request, every CI build |
| Common Tools | Applitools Eyes, OverlayQA, Chromatic | Percy, BackstopJS, Argos CI, Lost Pixel |
| Best For | Catching design drift from intent | Catching regressions before they reach production |
In practice, most modern visual testing tools do both. Percy catches regressions in CI pipelines but also lets designers review UI changes. Applitools Eyes handles both production validation and continuous regression checks. The distinction matters most when you’re choosing between tools built primarily for design QA versus tools built for developer workflows.
How Visual Testing Works
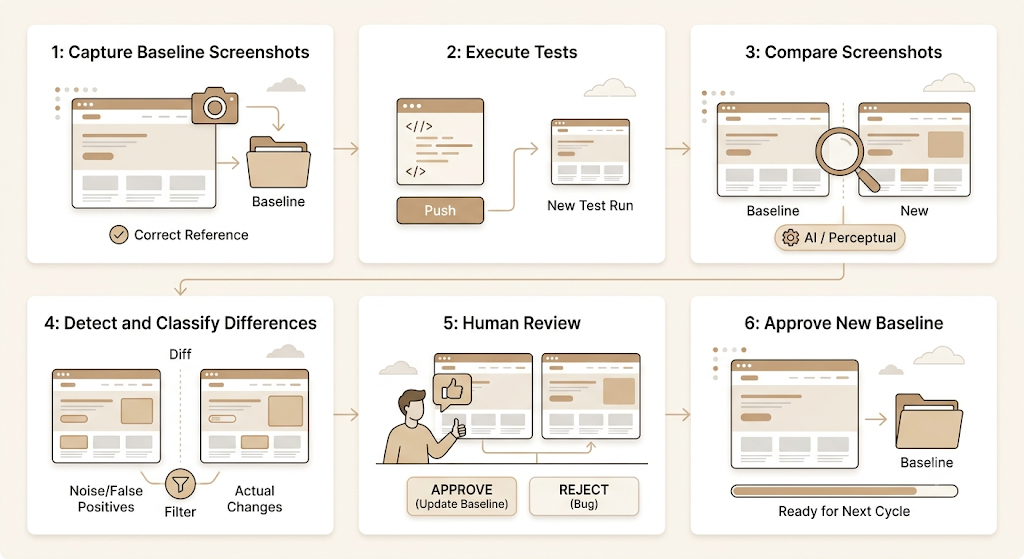
The core loop is the same across almost every tool, even when the details differ significantly.
Step 1: Capture baseline screenshots. The first time you run the test suite, the tool captures screenshots of your pages or components. These become the approved baseline -the “this is what correct looks like” reference.
Step 2: Execute tests. During subsequent test runs (usually triggered by a code push or pull request), the tool captures fresh screenshots of the same pages and components.
Step 3: Compare screenshots. The tool compares the new screenshots against the baseline. Simple tools do pixel-by-pixel comparison. Smarter tools use AI or perceptual diffing to identify whether the difference is meaningful or just noise from font rendering or anti-aliasing.
Step 4: Detect and classify differences. A diff is generated showing what changed. AI-powered tools filter out false positives automatically. Basic tools flag every pixel difference, which can flood your review queue.
Step 5: Human review. A developer or designer reviews flagged diffs and either approves the change (updating the baseline) or rejects it (filing a bug).
Step 6: Approve new baseline. Approved changes become the new baseline for future comparisons.
Automated visual testing follows a six-step loop: capture baseline screenshots, run tests on new builds, compare screenshots, classify differences, send diffs for human review, and update the baseline on approval. The critical variable is how the comparison step works. Pixel-by-pixel comparison generates high false-positive rates. AI-based perceptual diffing reduces noise by identifying whether a detected change is visually meaningful.
Types of Visual Testing
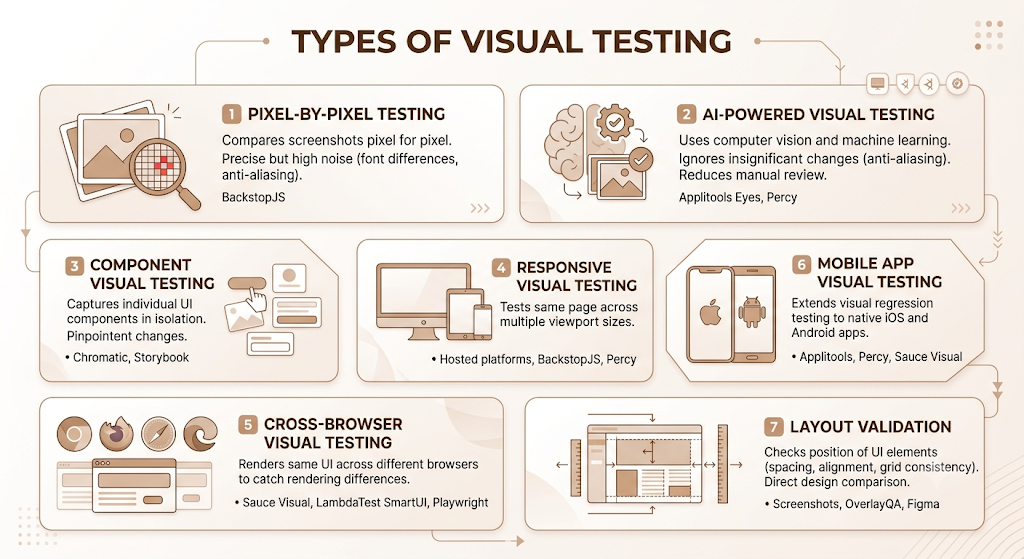
Not all visual testing is the same. Different testing types suit different parts of the development process.
Pixel-by-Pixel Testing
The oldest method. Two screenshots are compared pixel for pixel, and any mismatch is flagged. It’s precise but generates a lot of noise -font rendering differences between operating systems, anti-aliasing on browser edges, sub-pixel shifts from dynamic content -all trigger false positives. BackstopJS uses this approach by default.
AI-Powered Visual Testing
Tools like Applitools Eyes and Percy use computer vision and machine learning to evaluate visual diffs. Instead of counting mismatched pixels, they assess whether the change is meaningful -a button moved 40 pixels is flagged, a single anti-aliased edge pixel is ignored. This dramatically reduces the manual review burden.
Component Visual Testing
Rather than testing full pages, component visual testing captures individual UI components in isolation. Chromatic pioneered this for Storybook component libraries. It’s faster than full-page testing and makes it easy to pinpoint which component introduced a visual change.
Responsive Visual Testing
Tests the same page across multiple viewport sizes simultaneously. Most hosted platforms support this natively. BackstopJS lets you configure custom viewport lists. Percy runs snapshots across defined breakpoints in a single test run.
Cross-Browser Visual Testing
Renders the same UI across Chrome, Firefox, Safari, Edge, and more to catch browser-specific rendering differences. Sauce Visual and LambdaTest SmartUI specialise here. Playwright has built-in multi-browser support that works well for teams already on that framework.
Mobile App Visual Testing
Extends visual regression testing to native iOS and Android apps. Applitools supports mobile testing via Appium. Percy’s Desktop and Mobile plan covers real mobile browsers. Sauce Visual includes mobile device testing across real devices and simulators.
Layout Validation
Checks that UI elements are positioned correctly relative to each other -spacing, alignment, grid consistency. Some tools handle this through screenshot comparison; others, like OverlayQA, overlay production screenshots directly against Figma design files.
Key Features to Look for in Visual Testing Tools
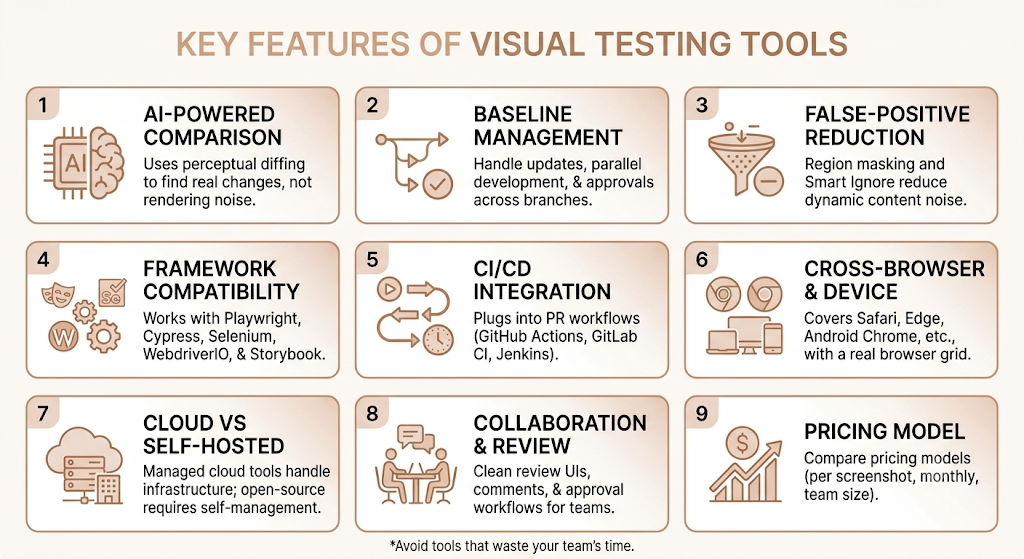
Before reviewing individual tools, here’s what actually separates a solid visual testing tool from one that wastes your team’s time.
AI-powered comparison: Pixel comparison alone generates too many false positives. Look for tools that use perceptual diffing or Visual AI to distinguish real regressions from rendering noise.
Baseline management: You need to handle baseline updates across branches, handle parallel development, and approve changes without accidentally overwriting the wrong baseline. This gets complicated fast on large teams.
False-positive reduction: This is the single biggest practical concern. Tools that flood your review queue with noise will get abandoned. Region masking (blocking out dynamic content like timestamps) and Smart Ignore modes help significantly.
Framework compatibility: Check whether the tool works with your current stack -Playwright, Cypress, Selenium, WebdriverIO, or Storybook. Switching frameworks to fit a visual testing tool is not a trade-off worth making.
CI/CD integration: GitHub Actions, GitLab CI, Jenkins, and CircleCI integrations are table stakes. The tool should plug directly into your PR workflow so visual diffs appear alongside code reviews.
Cross-browser and device coverage: If your app needs to look right on Safari, IE-era Edge, and Android Chrome, your visual testing tool needs a real browser grid -not just Chromium.
Cloud vs self-hosted: Managed cloud tools (Percy, Chromatic, Applitools) handle infrastructure. Open source tools (BackstopJS, Playwright) require you to manage screenshot rendering environments, which introduces its own consistency problems.
Collaboration and review workflow: Designers and developers need to review diffs together. Tools with clean review UIs, comment threads, and approval workflows save significant back-and-forth.
Pricing model: Some tools charge per screenshot, some per month, some by team size. At scale, per-screenshot pricing can get expensive fast.
Best Visual Testing Tools in 2026 -Quick Comparison
| Tool | Best For | AI | Open Source | Starting Price |
| Percy (BrowserStack) | Cross-browser, real devices | Yes | No | Free tier; paid from $199/mo |
| Applitools Eyes | Enterprise, complex UIs | Yes (Visual AI) | No | Custom |
| Chromatic | Storybook, component testing | Partial | No | Free for open source |
| Playwright | Developer-first, free | No | Yes | Free |
| BackstopJS | Simple pixel comparison | No | Yes | Free |
| Happo | Component screenshots, design systems | No | No | Paid |
| Sauce Visual | Enterprise, browser coverage | Yes | No | Custom |
| Cypress Visual Testing | Cypress-native workflows | Partial | Partial | Free (plugins) |
| Lost Pixel | Lightweight, Git-native | No | Yes | Free tier available |
| Argos CI | GitHub-native, affordable | Partial | Yes | Free tier; paid from ~$30/mo |
| LambdaTest SmartUI | Cross-browser cloud testing | Yes | No | Paid plans available |
| Reflect | No-code teams | Yes | No | Paid |
| OverlayQA | Figma-to-production comparison | Yes | No | Paid |
| Recheck-Web | Golden master testing | No | Yes | Free |
| Ghost Inspector | Browser monitoring, screenshot checks | No | No | Paid |
Visual Testing Tool Reviews
1. Percy (BrowserStack)
Percy is one of the most widely used visual regression testing tools for web teams. It’s now part of BrowserStack, which means it sits alongside a massive real device and browser cloud.
How it works: Percy integrates with your existing test framework -Playwright, Selenium, Cypress, or others -via a CLI or SDK. During test runs, it captures DOM snapshots and renders them on Percy’s cloud infrastructure across defined browsers and viewports. The before/after diffs appear directly in GitHub or GitLab as PR status checks.
What makes it stand out: Percy’s Visual Review Agent uses AI to handle bulk diff review, flagging only the changes that matter. According to BrowserStack, this can reduce screenshot review time significantly on large test suites. The real device cloud is a genuine differentiator -getting consistent screenshots across 50,000+ real browsers and devices removes the environmental flakiness that plagues self-hosted setups.
Pricing: Free tier available. Desktop plan starts at $199/month (billed annually) for 10,000 screenshots. Desktop and Mobile plan starts at $599/month for 25,000 screenshots and real mobile browser testing. Enterprise pricing is custom.
Best for: Teams that want a reliable, hosted visual regression testing solution with strong CI/CD integration and broad browser coverage.
Honest limitation: Percy is not the right pick if your workflow is almost entirely Storybook-based -Chromatic is purpose-built for that.
2. Applitools Eyes
Applitools has been in AI-powered visual testing longer than any other vendor. Their Visual AI engine doesn’t compare pixels -it uses computer vision to understand what’s on screen and evaluate whether a change is meaningful.
What makes it stand out: The Ultrafast Grid renders your application across multiple browsers and viewports by capturing the DOM once and re-rendering it server-side. This is faster than running separate browser instances for each combination. In January 2026, Applitools shipped Eyes 10.22, which added a Storybook Addon for component-level testing and a Figma Plugin that lets designers compare production screenshots directly against Figma designs.
Key features: Visual AI comparison, Ultrafast Grid, self-healing test capabilities, Figma integration, support for Selenium, Cypress, Playwright, WebdriverIO, Appium, and others.
Pricing: No permanent free tier. Custom enterprise pricing. One published reference puts the platform at $969/month for standard packages, with enterprise packages higher.
Best for: Enterprise teams with complex UIs, heavy cross-browser requirements, and strong designer-developer collaboration needs. The AI diffing handles edge cases that pixel-based tools struggle with.
Applitools Eyes uses a Visual AI engine that applies computer vision to evaluate UI screenshots, rather than comparing individual pixels. This approach reduces false positives from font rendering differences, anti-aliasing, and sub-pixel shifts. The Ultrafast Grid renders pages across multiple browsers from a single DOM capture, reducing the time required for cross-browser visual testing.
3. Chromatic
Chromatic is made by the team behind Storybook. If your component library lives in Storybook, this is the natural fit.
How it works: You run npx chromatic in CI, and Chromatic captures every story in your Storybook. Changes appear as before/after diffs in a review UI. Team members -including designers -approve or reject changes. Approved changes update the baseline.
What makes it stand out: TurboSnap only re-renders the components that have actually changed in a given commit, making it significantly faster than tools that re-capture everything on every run. It also supports Storybook’s play functions, so you can capture visual states after simulated user interactions -getting closer to end-to-end visual coverage without leaving the component environment.
Pricing: Free for open source projects. Paid plans for private repos are based on snapshot count.
Best for: Frontend teams and design systems teams using Storybook. Less suited for full-page end-to-end visual testing outside the Storybook environment.
4. Playwright Visual Testing
Playwright is Microsoft’s open source cross-browser testing framework, and it ships with built-in screenshot assertion capabilities -no third-party visual testing tool required.
How it works: You call expect(page).toHaveScreenshot() in a Playwright test. On the first run, it saves a baseline. On subsequent runs, it compares against that baseline and fails the test if the diff exceeds your configured threshold.
What makes it stand out: It’s free, it’s built-in, and it runs across Chromium, Firefox, and WebKit. For developer-first teams who want to keep their toolstack simple, Playwright’s native visual testing is a legitimate option -especially for component-level checks and critical user journey validation.
Honest limitation: Playwright’s built-in comparison is pixel-based. Managing baselines across branches, handling false positives from rendering differences across OS environments, and scaling to thousands of screenshots are all challenges you’d need to solve yourself. That’s why many teams use Playwright as the automation layer but pipe visual snapshots to a hosted tool like Argos CI or Lost Pixel.
Best for: Developer teams who want free, framework-native visual assertions for targeted checks. Not the right choice if you need a review workflow, AI diffing, or multi-browser cloud infrastructure.
5. BackstopJS
BackstopJS is the classic open source visual regression tool. It’s been around since 2014, it’s free, and it works.
How it works: You define test scenarios in a JSON config file, specifying URLs, selectors, and viewport sizes. BackstopJS captures screenshots using Puppeteer or Playwright, then compares them pixel by pixel. Diffs appear in a local HTML report.
Pricing: Free and open source.
Best for: Teams that want a lightweight, self-hosted pixel comparison tool without budget or infrastructure requirements. Good for testing static or low-dynamic websites where false positives from pixel noise aren’t a major concern.
Limitation: No cloud infrastructure, no AI diffing, no collaboration tools. Environmental consistency is your problem to solve.
6. Happo
Happo focuses on component screenshot testing, with a particular emphasis on design systems and cross-browser rendering accuracy.
What makes it stand out: Happo renders components in real browsers across defined configurations and stores the results on its cloud platform. It integrates with Storybook, React, and other component frameworks. The review workflow is clean, with side-by-side comparison views.
Best for: Design system teams that want cross-browser component screenshot accuracy without the full complexity of enterprise tools like Applitools.
7. Sauce Visual (Sauce Labs)
Sauce Visual is Sauce Labs’ visual testing module, built on top of their existing cross-browser and real device infrastructure.
What makes it stand out: Sauce Visual combines DOM snapshot comparison with screenshot comparison, which means it can catch structural UI changes that might not show up in a pure screenshot diff. It integrates with Selenium, Cypress, WebdriverIO, and Playwright. The Sauce Labs device cloud gives you broad browser and OS coverage without managing your own infrastructure.
Best for: Enterprise teams already using Sauce Labs for functional testing who want to add visual regression coverage without onboarding a separate tool.
8. Cypress Visual Testing
Cypress doesn’t have native visual testing built in, but the Cypress ecosystem has several plugins that add screenshot comparison -most notably cypress-image-snapshot and integrations with Percy or Applitools.
How it works: Plugins capture screenshots at defined checkpoints in Cypress tests and compare them against baselines. When combined with a hosted tool like Percy, the review workflow is handled in Percy’s platform. When using local plugins, you manage baselines yourself.
Best for: Teams already invested in Cypress who want visual regression coverage without switching frameworks. The integration quality depends on which plugin or hosted tool you connect.
9. Lost Pixel
Lost Pixel is a modern, open source visual regression platform with a lightweight setup and tight Git integration.
How it works: Lost Pixel captures screenshots of Storybook stories, Ladle stories, or full pages, then compares them against baselines stored in your Git repository. Diffs appear in pull requests.
What makes it stand out: Keeping baselines in Git is a deliberate design choice -it means your visual baselines are version-controlled alongside your code, which some teams strongly prefer. The cloud platform offers a hosted option with a review UI.
Pricing: Open source and free for self-hosted use. Cloud platform has a free tier.
Best for: Teams that want a modern, Git-native visual regression workflow with low infrastructure overhead.
10. Argos CI
Argos CI is an open-source visual testing platform with a strong GitHub integration and accessible pricing.
How it works: Argos integrates with Playwright, Cypress, and Storybook. It captures screenshots during CI runs and stores them on Argos’s cloud. Diffs appear in GitHub pull requests. The comparison is perceptual rather than pure pixel-based, which reduces noise.
Pricing: Free tier available. Paid plans start at approximately $30/month for private repositories.
Best for: Teams that want open source transparency, GitHub-native integration, and affordable pricing. A good middle ground between fully free self-hosted tools and premium enterprise platforms.
11. LambdaTest SmartUI
LambdaTest rebranded its testing platform to TestMu AI in January 2026. SmartUI is the visual regression testing component within that platform.
What makes it stand out: SmartUI includes region-based masking to handle dynamic content like timestamps and ads. The Smart Ignore mode uses heuristics to suppress known false-positive patterns automatically. It integrates with Selenium, Cypress, Playwright, and Storybook, and runs on LambdaTest’s cloud infrastructure for cross-browser coverage.
Best for: Teams that want AI-assisted cross-browser visual testing at a more accessible price point than enterprise tools, especially those already using LambdaTest for functional testing.
12. Reflect
Reflect is a no-code testing platform with built-in visual validation. Rather than requiring test scripts, it records user interactions through a browser-based recorder.
What makes it stand out: Visual validation is built into automated test flows -you don’t need to write separate visual test code. Reflect also supports email and SMS testing flows, which is useful for teams testing multi-step user journeys like registration or password reset. It integrates with GitHub, Slack, JIRA, GitLab, CircleCI, and Jenkins.
Best for: QA teams or product teams without dedicated engineering resources who need visual validation as part of broader no-code automation.
13. OverlayQA
OverlayQA is a design QA tool that compares production screenshots directly against Figma design files using AI.
What makes it stand out: Rather than comparing one build against another, OverlayQA overlays the live UI against the original design intent. This is a different use case from standard visual regression -it’s about catching design drift between what designers specified and what actually shipped.
Best for: Design-engineering teams that want to close the gap between Figma designs and production UI. More useful at design handoff and post-release design review than in ongoing CI regression testing.
14. Recheck-Web
Recheck-Web is an open source visual testing tool that uses a “golden master” approach -capturing the full state of a web page and comparing it against a reference.
What makes it stand out: Rather than pure screenshot comparison, Recheck-Web captures the full rendered state of the page including invisible elements and compares them structurally. This catches changes that might not show up visually but still represent UI drift.
Pricing: Free and open source.
Best for: Teams interested in deeper UI state comparison beyond screenshot-level diffs, comfortable with a self-hosted, open source setup.
15. Ghost Inspector
Ghost Inspector is a browser-based test automation platform with built-in screenshot capture and comparison.
What makes it stand out: Ghost Inspector records browser sessions and replays them as automated tests. Visual comparison is built in -it captures screenshots during test runs and flags visual changes. It’s also used for production monitoring, replaying tests on live environments at scheduled intervals.
Best for: Teams that want browser automation, visual checks, and production monitoring in one tool, without needing to maintain test code.
Open Source vs Paid Visual Testing Tools
There’s no universally right answer here. The choice depends on your team’s capacity, scale, and how much consistency you need across environments.
| Open Source | Paid / Hosted | |
| Advantages | Free, full control, no vendor lock-in | Managed infrastructure, AI diffing, review workflows |
| Limitations | Environmental consistency is your problem, no collaboration UI | Ongoing cost, per-screenshot pricing at scale |
The practical challenge with open source tools like BackstopJS, Playwright’s native visual assertions, and Argos CI is environmental consistency. A screenshot captured on your Mac will render slightly differently than one captured on a Linux CI server -different font rendering, different GPU compositing. Hosted tools like Percy, Applitools Eyes, and Chromatic solve this by rendering screenshots in controlled, consistent cloud environments.
For small teams testing mostly static content, open source is a reasonable starting point. For teams running visual testing across dozens of browsers, hundreds of components, and thousands of PRs per month, the managed infrastructure and AI-assisted review of paid tools usually pay for themselves in saved engineering time.
How to Choose the Right Visual Testing Tool
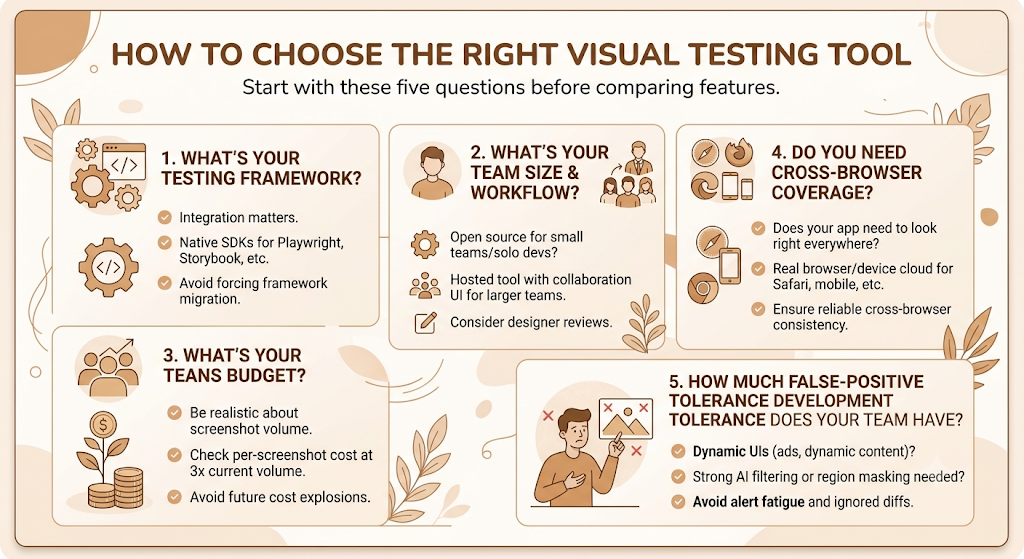
Start with these five questions before comparing features.
What’s your testing framework? If you’re on Playwright, tools with native Playwright SDKs (Percy, Argos CI, Lost Pixel) will integrate cleanly. If you’re heavily using Storybook, Chromatic is the obvious starting point. Forcing a framework migration to fit a visual testing tool is rarely worth it.
What’s your team size and workflow? Solo developers or small teams often do fine with open source tools managed locally. Larger teams with designers reviewing visual diffs need a hosted tool with a clean collaboration UI.
What’s your budget? Be realistic about screenshot volumes. A tool priced at $199/month for 10,000 screenshots may be fine at launch and expensive six months later. Check the per-screenshot cost at 3x your current volume before committing.
Do you need cross-browser coverage? If your app needs to look right on Safari, Firefox, and older Android WebViews, you need a tool with a real browser or device cloud. Playwright alone won’t get you there reliably.
How much false-positive tolerance does your team have? If your developers start ignoring visual diffs because too many are noise, the whole system breaks down. Teams with dynamic UIs (ads, timestamps, user-generated content) need strong AI filtering or region masking -otherwise pixel-based tools will cause more problems than they solve.
Choosing a visual testing tool comes down to five factors: your existing testing framework, team size and review workflow needs, budget at scale, cross-browser coverage requirements, and tolerance for false positives. Teams with dynamic UIs or large component libraries benefit most from AI-powered tools with perceptual diffing. Teams testing static sites or simple UIs often find open source pixel comparison sufficient.
Common Challenges in Visual Testing (and What to Do About Them)
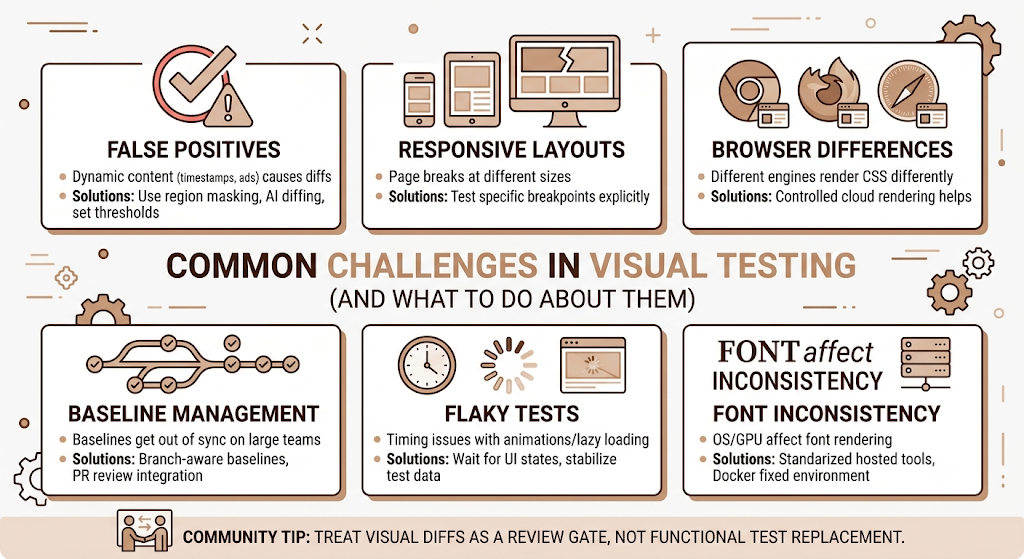
False positives: The biggest practical complaint about visual testing. Dynamic content -timestamps, ads, user avatars, carousels -changes between runs and triggers diffs. Solutions: use region masking to block dynamic areas, use tools with AI-based perceptual diffing, and set your comparison threshold to ignore sub-pixel differences.
Responsive layout complexity: A page that looks right at 1440px may break at 768px. Test critical breakpoints explicitly rather than testing everything at every viewport. Most tools let you define a specific list of viewports.
Browser rendering differences: The same CSS renders differently in Chrome, Firefox, and Safari. This is a legitimate source of diffs, not a tool failure. Hosted tools with controlled cloud rendering environments reduce (but don’t eliminate) this.
Baseline management at scale: On a team with multiple feature branches, baselines can get out of sync. Use branch-aware baselines where available (Percy and Chromatic both support this). Make baseline updates part of your PR review process, not an afterthought.
Flaky tests: Visual tests fail intermittently because of timing issues -the screenshot captures before an animation finishes, or a lazy-loaded image hasn’t appeared yet. Fix this at the test level: wait for specific UI states before capturing, and stabilise test data before running visual checks.
Font rendering inconsistency: Font rendering varies by OS and GPU. On self-hosted setups, this is a significant source of false positives. Hosted tools with standardised rendering environments solve this. If you’re self-hosting, run your screenshot capture in Docker with a fixed Linux environment.
Community practitioners consistently recommend treating visual diffs as a review gate -something that blocks a merge if a human hasn’t approved it -rather than treating visual testing as a replacement for functional testing.
Best Practices for Visual Testing
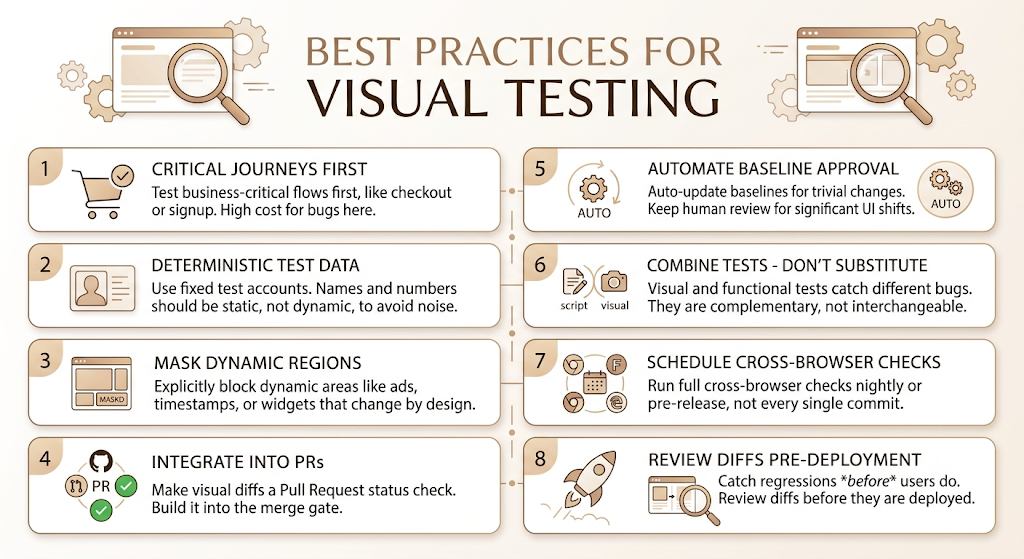
- Test critical user journeys first. Don’t try to test every page from day one. Start with your most business-critical flows -checkout, sign-up, onboarding -where a visual bug has the highest cost.
- Use deterministic test data. If your UI renders user names, profile pictures, or dynamic counts, these will change between runs and generate noise. Use fixed test accounts with static data for visual test runs.
- Mask dynamic regions explicitly. Most visual testing tools support region masking -blocking out areas of the screenshot that change by design (timestamps, ads, live data widgets). Use this aggressively for anything that isn’t part of your core UI.
- Integrate into pull requests. Visual diffs should appear as a PR status check, not a separate report someone has to remember to look at. If visual approval isn’t part of the merge gate, it gets skipped under deadline pressure.
- Automate baseline approval for low-risk changes. Some tools allow automatic baseline updates for changes under a certain diff threshold. Use this for trivial changes (a version number update, a minor font weight tweak), but keep human review for significant changes.
- Combine visual and functional testing -don’t substitute. Visual testing catches what functional tests miss. Functional testing catches what visual tests miss. They’re complementary, not interchangeable.
- Run cross-browser checks on a schedule, not every commit. Full cross-browser visual runs are slow and expensive. Run them nightly or before releases, not on every PR.
- Review diffs before deployment, not after. The whole value of visual testing is catching regressions before users see them. Reviewing diffs post-deployment defeats the purpose.
Future Trends in Visual Testing (2026 and Beyond)
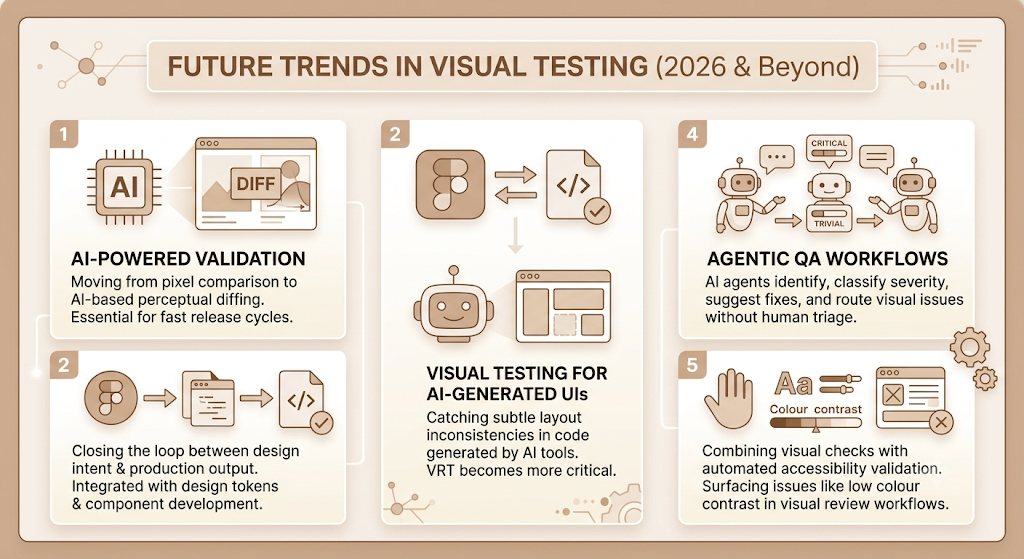
AI-powered validation is the new standard. The shift from pixel comparison to AI-based perceptual diffing is already well underway. By the end of 2026, tools still offering only pixel comparison without AI filtering will be difficult to justify in teams running fast release cycles.
Design-to-code validation is growing. Applitools’ Figma Plugin and OverlayQA’s design overlay approach point to where things are heading -closing the loop between design intent and production output, not just catching regressions between builds. As more teams move to design tokens and component-driven development, this type of validation will become standard.
Visual testing for AI-generated UIs. More teams are using AI tools to generate frontend code. That code can introduce subtle layout inconsistencies that no human reviewer would catch during code review. Visual regression testing becomes more important, not less, as AI-generated code becomes more common.
Agentic QA workflows. The next generation of QA tooling involves AI agents that can identify visual issues, classify them by severity, suggest fixes, and even route them to the right team member without human triage. Tools like QA.tech are early experiments in this direction. It’s not mainstream yet, but the pattern is visible.
Accessibility-aware visual testing. Teams are starting to combine visual testing with automated accessibility checks. A layout shift that passes a visual diff might still introduce an accessibility violation -insufficient colour contrast after a CSS change, for example. Tools that surface in the same review workflow will have a significant advantage.
Conclusion
Visual testing isn’t a luxury feature for teams with large QA budgets. It’s a practical gap-filler for something functional tests genuinely cannot do -verify that your UI looks right, not just works.
The good news is that the tool options in 2026 are significantly better than they were even two years ago. AI-powered diffing has reduced the false-positive problem that made earlier visual testing tools frustrating to maintain. Hosted infrastructure has solved the environmental consistency problem that made self-hosted tools unreliable at scale. And tighter design-to-code integrations are closing the loop between what designers spec and what actually ships.
Start with your most critical user journeys, pick a tool that fits your existing stack, and integrate visual diffs into your PR workflow before anything else. The teams that get the most value from visual testing aren’t the ones with the most sophisticated tooling -they’re the ones who’ve made visual review a consistent habit.
Frequently Asked Questions About Visual Testing Tools
What is visual testing?
Visual testing is the process of checking that a software application’s user interface looks the way it’s supposed to -verifying visual appearance, layout, and rendering rather than just functionality. It uses screenshot comparison to detect visual regressions, layout shifts, and rendering inconsistencies.
What is visual regression testing?
Visual regression testing is a subset of visual testing focused specifically on catching unintended visual changes introduced by code updates. A baseline screenshot is captured, then future builds are compared against it after each code change to flag differences.
Which visual testing tool is best in 2026?
There’s no single best tool -it depends on your stack and needs. Percy (BrowserStack) is the strongest all-rounder for web teams needing CI/CD integration and real device coverage. Chromatic is the best fit for Storybook users. Applitools Eyes is the most capable for enterprise teams with complex AI diffing requirements. For free open source options, Playwright’s built-in visual assertions or Argos CI are solid starting points.
Is Playwright enough for visual testing?
For simple use cases -a handful of critical pages, a single-browser requirement, a small team -Playwright’s built-in screenshot assertions can work. But Playwright alone doesn’t give you a review workflow, AI-based diffing, cross-browser cloud rendering, or baseline management across branches. Most teams use Playwright as the automation layer and connect it to a hosted visual testing platform.
What’s the difference between Percy and Applitools?
Percy is stronger on real device and cross-browser coverage, with clean CI/CD integration and a more accessible pricing model. Applitools Eyes has the more sophisticated Visual AI engine, better handling of complex UI states, and deeper enterprise features including Figma integration. Percy suits most mid-market teams; Applitools is the choice for larger enterprises with complex requirements and budget.
Are there free visual testing tools?
Yes. Playwright’s built-in visual testing, BackstopJS, Argos CI (free tier), Lost Pixel, and Recheck-Web are all free or open source. The trade-off is that you manage your own infrastructure, handle environmental consistency, and lack AI-based false-positive filtering.
Can visual testing detect responsive design issues?
Yes -it’s one of the primary use cases. Most visual testing tools let you define specific viewport sizes and capture screenshots at each. Any layout that breaks at a specific breakpoint shows up as a diff. This is far more reliable than manual responsive checking across screen sizes.
Which visual testing tools support Storybook?
Chromatic is purpose-built for Storybook. Applitools Eyes added a Storybook Addon in January 2026. LambdaTest SmartUI supports Storybook integration. Argos CI also works with Storybook via its screenshot capture integrations.
Which visual testing tools use AI?
Percy uses AI for its Visual Review Agent to reduce review noise. Applitools Eyes uses its Visual AI engine for perceptual comparison. LambdaTest SmartUI uses AI-based Smart Ignore heuristics. Sauce Visual combines AI with DOM comparison. OverlayQA uses AI to compare production screenshots against Figma designs.
Can visual testing replace functional testing?
No. Visual testing and functional testing are complementary, not interchangeable. Functional tests verify that your application does what it’s supposed to do -buttons work, forms submit, APIs respond correctly. Visual tests verify that the UI looks right. A checkout button can be fully functional while sitting in the wrong position on screen. You need both.
Which tools integrate with GitHub Actions?
Percy, Chromatic, Applitools Eyes, Argos CI, Lost Pixel, Sauce Visual, and LambdaTest SmartUI all integrate with GitHub Actions. Playwright’s visual testing works in GitHub Actions natively since it’s just a test framework. BackstopJS can be run in GitHub Actions with a custom configuration.
Do visual testing tools support mobile apps?
Percy’s Desktop and Mobile plan covers real mobile browsers. Applitools Eyes supports mobile testing via Appium for native iOS and Android apps. Sauce Visual includes real mobile device testing through Sauce Labs’ device cloud. LambdaTest SmartUI offers mobile browser coverage through its cloud platform.
How do visual testing tools reduce false positives?
The main methods are AI-based perceptual diffing (filtering out noise from anti-aliasing and font rendering), region masking (blocking dynamic content areas from comparison), configurable diff thresholds (ignoring changes below a pixel difference percentage), and stable cloud rendering environments (eliminating OS-level rendering inconsistencies).
Which open source visual testing tool is best?
For teams using Playwright, the built-in screenshot assertions are the simplest starting point. Argos CI adds a hosted review layer on top of open source tooling. BackstopJS is the established choice for pixel comparison on static sites. Lost Pixel is the best modern option for Git-native baseline management.
How much do visual testing tools cost?
Pricing varies significantly. Open source tools are free. Percy’s paid plans start at $199/month for 10,000 screenshots. Argos CI starts around $30/month for private repos. Applitools and Sauce Visual are custom enterprise pricing, typically in the range of $500-$1,000+/month depending on scale. At high screenshot volumes, per-screenshot pricing models can add up quickly -calculate your expected monthly volume before committing.