
Every morning, before I look at anything else, I used to open Meta Ads Manager, flip between two ad accounts, and manually copy spend, CPM, CTR, and results into a sheet. By the time I’d finished, half my morning was gone and the numbers were already a day stale in my head. If you run ads across more than one account, you know exactly what I’m describing.
I wanted to automate Meta Ads reporting with Claude Code (without adding another line item to my software budget). What I ended up building runs entirely on Claude Code, a free MCP connector, and the Gmail API. It pulls campaign data every morning at 9 AM, flags which campaigns are actually underperforming (not just which ones spent the most), drills into the specific ad set or creative dragging performance down, and emails the whole thing to me and my team before I’ve had coffee.
This isn’t a theoretical walkthrough. It’s the exact process I used, including the parts that broke and the fixes that actually worked. I’m also going to flag every place I got something wrong, because those mistakes are more useful to you than a clean success story would be.
Table of Contents
What You Need Before You Start
You need four things before you open a single terminal window: access to Claude Code (claude.ai/code, the cloud version, not the local VS Code extension), admin or reporting access to your Meta ad account through Meta Business Manager, a Gmail account you’re comfortable sending from, and roughly 45 minutes of uninterrupted setup time. Most of that 45 minutes goes into a one-time Google authorization flow, not the actual report logic.
MCP (Model Context Protocol) is the standard that lets an AI model like Claude connect directly to external tools such as Meta Ads Manager or Gmail, without you writing custom integration code for each one. Think of it as a plug that Anthropic and other companies have standardized, so Claude can read your ad account data the same way it reads a file on your computer.
One thing worth knowing upfront: this build uses your ad account IDs, which look like act_ followed by a long number. You’ll find yours inside Meta Ads Manager’s URL bar when you’re viewing a specific account. Keep them handy, you’ll need them in the very first prompt.
Why Claude Code Instead of Cowork or a Zapier(or N8N)-Style Tool
Honestly, I almost went with Claude’s Cowork scheduled tasks first, since the setup is friendlier. Then I found the catch: Cowork scheduled tasks only fire while your desktop app is open and your machine is awake. If your laptop’s asleep at 9 AM, the task queues until you next open the app. For a report you’re relying on every single morning, that’s not good enough.
Claude Code’s cloud Routines solve this. They run on Anthropic’s own infrastructure, independent of whether your laptop is on. That reliability difference is the whole reason this build works as a genuine “wake up to a finished report” system instead of “open your laptop and hope it already ran.”
The cost angle matters too. I didn’t want to add Zapier, Make, or a dedicated reporting SaaS just for one daily email. Claude Code, the Meta Ads MCP connector, and the Gmail API cost nothing beyond what most marketers already pay for Claude. That’s not a small thing if you’re running lean.
Automating a daily ad performance report removes the manual data pull, formatting, and cross-checking that otherwise eats into a marketer’s morning. According to a 2024 Sprout Social survey of 500 social media marketers in the US and UK, data analysis and reporting alone consumes an average of 3.8 hours per week, time that shifts almost entirely to strategy once the pull and formatting steps are automated.
Step 1: Connect the Meta Ads MCP Connector and Pull a Test Report
Direct answer: Connect the Meta Ads MCP connector inside Claude Code, then run a single prompt asking it to pull yesterday’s raw campaign data for your ad accounts, before you build any calculations on top.
Open claude.ai/code and start a new session. Claude Code needs a workspace to run in, even for a task that isn’t really “coding,” so if it asks you to select or create a repo, create an empty one and give it a name like ads-report.
Check that the Meta Ads MCP connector and Gmail connector both show as active for that session. Ask Claude Code directly: “what MCP connectors do I have access to in this session?” If Meta Ads MCP doesn’t show up, you’ll need to connect it through your Claude account settings first.
Now run your first real prompt:
Using the Meta Ads MCP connector, pull campaign-level performance data for yesterday for these ad accounts: act_XXXXXXXXX and act_YYYYYYYYY. For each campaign, show me: campaign name, ad account, spend, results/conversions, impressions, clicks, CPM, CTR, CPC. Just show me the raw data in a table, don't calculateanything else yet.Replace the act_ numbers with your own account IDs (if you just have one ad account, use only that). Don’t calculate anything at this stage. You want to see the raw pull first and catch problems before they get buried under formulas.
Here’s what to check once it comes back. First, does it return data for every ad account you asked for, not just one? Second, does the “results” field actually match the campaign’s real objective, meaning a lead-gen campaign shows lead count, not generic link clicks. Third, do the numbers roughly match what you see if you open Ads Manager yourself for the same day. You’re not reconciling to the rupee or dollar, just confirming nothing is obviously broken.
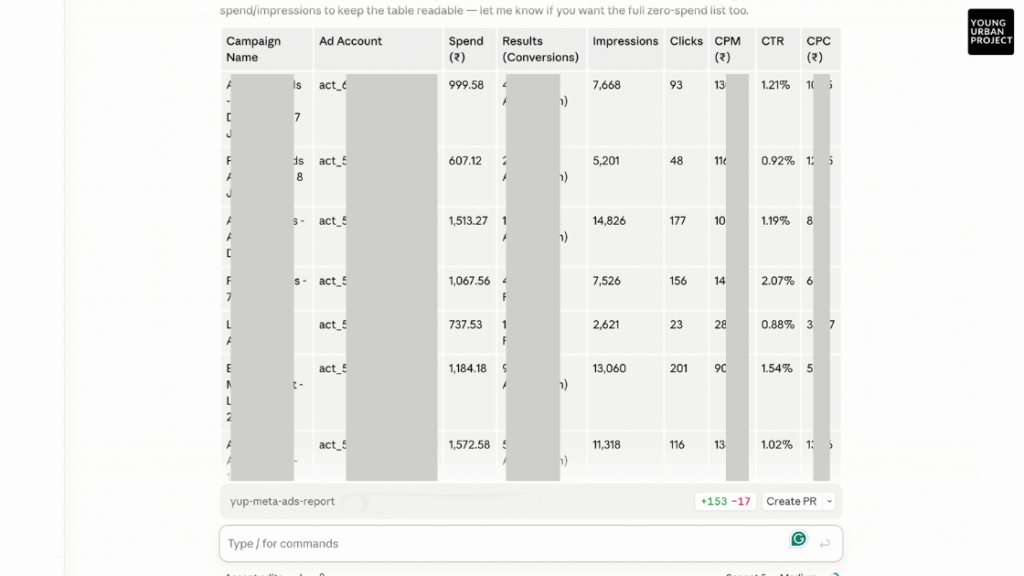
If a campaign spend shows as zero when you know it ran, or the account ID comes back empty, double-check the ID itself. Account IDs are usually 15-17 digits. Anything shorter is likely a Page ID or Business Manager ID grabbed by mistake, not the actual ad account.
Step 2: Build the Metrics That Actually Matter
Direct answer: Spend, CPM, CTR, and CPC only tell you what happened. Cost per result and a properly weighted 7-day baseline tell you whether it’s working, which is the number that should actually drive a scale-or-pause decision.
Cost per result is spend divided by results, meaning it tells you what you paid for each lead, application, or purchase a campaign generated. Once you have raw data flowing, this is the single most important addition, because CPM and CTR can look fine on a campaign that’s quietly burning money with zero conversions.
Here’s a mistake worth avoiding before you even build this: don’t have the model eyeball the math from raw numbers in its head. Have it write and run actual code that computes cost per result, CPM, CTR, and CPC deterministically from the pulled data. You’re going to make budget decisions off this. Arithmetic errors compound into wrong calls, and an AI model doing mental math on a table of numbers is exactly where small errors sneak in.
The prompt that builds this:
Write a Python script that does the following using the Meta Ads MCP connector: 1. Pull campaign-level data for [your account IDs] for yesterday, filtered to campaigns with non-zero spend. 2. Pull the same data for the trailing 7 days, day by day, for those campaigns, to use as a baseline. 3. For each campaign, calculate: spend, results, cost per result, CPM, CTR, CPC. 4. Calculate each campaign's 7-day trailing average for cost per result, CPM, CTR, and CPC, using the weighted method: total spend across the 7 days divided by total results across the 7 days, not an average of each day's individual ratio. 5. Flag each campaign "Above Average" or "Below Average" on cost per result versus its own 7-day average, but only if yesterday's spend for that campaign clears a minimum threshold you specify. Campaigns below the threshold should show "Not enough spend to flag" instead. 6. Calculate trend direction (up or down) for cost per result and CTR, comparing yesterday to the day before. 7. Output a clean table grouped by ad account, sorted by spend descending. Do the math in the script itself using actual numbers pulled from the API. Don't estimate or approximate anything. Save the script to a file so it can be reused daily.Two details in that prompt matter more than they look. The “weighted method” instruction exists because a simple average of daily cost-per-result ratios gets wrecked by a single low-volume day with one expensive fluke conversion. I watched this happen: one campaign showed a 7-day average four times higher than its actual daily figure, purely because one day in that window had a single conversion that skewed the ratio. Weighting by total spend and total results across the window fixes it.
The minimum spend threshold matters just as much. I initially set mine to a round number that felt safe, and every single campaign came in under it, meaning nothing ever got flagged. Set your threshold based on your actual daily campaign spend, not a number that sounds reasonable in the abstract. If your campaigns typically spend $10-25 a day, a $200 threshold is useless.
A meaningful minimum spend threshold and a spend-weighted 7-day baseline are what separate a genuinely useful ad performance flag from noise. Simple day-over-day averages get distorted by low-volume days, and thresholds set arbitrarily high mean campaigns never clear the bar to get flagged at all.
Step 3: Add Campaign-Level Recommendations Without Losing Accuracy
Direct answer: Keep the math and the judgment in two separate steps. Let a script calculate the numbers with zero room for error, then have Claude reason over the finished table to write the actual diagnosis and recommendation.
Once the metrics table is solid, the next layer is what turns a spreadsheet into something you can act on in thirty seconds: a plain-language diagnosis and one specific action per campaign. This is where drilling into ad-set and creative level data pays off, but only for campaigns that are actually underperforming. Pulling that granular data for every campaign daily bloats the report and slows the whole pull down for no benefit.
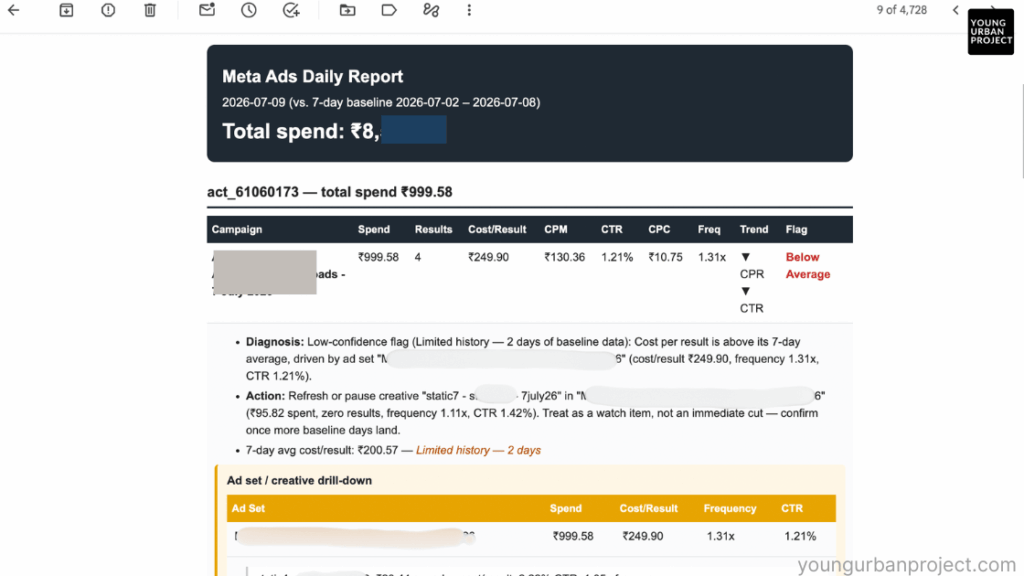
Extend the script: 1. Also pull Frequency (average impressions per person) for each campaign, yesterday and 7-day trailing. 2. For any campaign flagged "Below Average," pull ad-set level data for that campaign: ad set name, spend, cost per result, frequency, CTR. 3. For any ad set within a flagged campaign that itself looks weak (cost per result above the campaign average, or frequency above 3), pull creative-level data: creative name, spend, cost per result, CTR, frequency. 4. For every campaign, write a one-line diagnosis based strictly on the numbers in the table, and one specific action (scale by a percentage, refresh creative, tighten audience, pause, or no action needed). Do not speculate beyond what the data shows. 5. For flagged campaigns, name the actual underperforming ad set or creative in the recommendation, using the drill-down data, instead of a generic instruction. 6. Format the whole thing as clean HTML for email: a header with date and total spend, one section per ad account, the main metrics table, and the diagnosis plus action as bullet points under each campaign.Frequency measures how many times, on average, a single person has seen your ad. This one number is what tells you why a campaign is struggling. High frequency paired with falling CTR usually means ad fatigue, meaning the fix is a fresh creative. Low frequency with falling CTR usually points to a targeting or audience relevance problem instead.
I caught a real bug during this step that’s worth flagging as a general lesson. My first version of the “worst ad set” logic ranked creatives by cost per result, treating any creative with zero conversions as if it cost nothing (because dividing by zero results defaulted to zero, not infinity or “worst case”). That meant the script was flagging the creative that actually converted as the problem, and ignoring the one that spent money and got nothing. Backwards, and dangerous if you’d acted on it. If you build something similar, explicitly test what happens to a zero-conversion campaign in your ranking logic before you trust it.
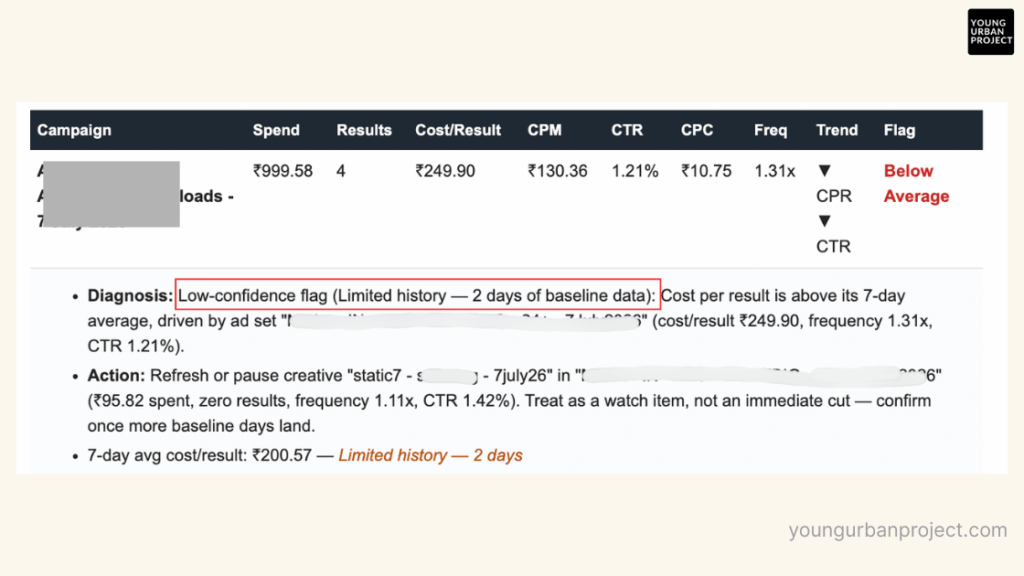
Also add a confidence check for thin data. A campaign with only 2 days of trailing history shouldn’t get flagged with the same confidence as one with a full 7 days. I added a rule that shows “Limited history” and hedges the language (“appears to be,” “treat as directional”) instead of stating a flag flatly when the baseline is thin.
Step 4: Getting the Report Into Your Inbox
Direct answer: Gmail’s MCP connector can only create drafts, not send email, so this build uses the Gmail API directly with a one-time OAuth setup, which is the more reliable path anyway once it’s configured.
This is the step where I hit the most friction, so I’m going to walk through it in the order I actually solved it, including the dead ends.
The first dead end: Gmail MCP only drafts. I assumed the Gmail connector could send email directly. It can’t. Ask Claude Code to list every tool the Gmail MCP connector exposes in your session, and you’ll see create_draft, search_threads, list_drafts, and label management tools, but nothing called send. A draft sitting in your folder every morning defeats the purpose of automation, since you’d still have to open Gmail and click send yourself.
The second dead end: raw SMTP. The next attempt was sending via Python’s smtplib using a Gmail app password (generate one at myaccount.google.com/apppasswords, under Security, once 2-Step Verification is on). This works fine on your own laptop. It does not work inside Claude Code’s cloud environment, because cloud sandboxes typically allow standard HTTPS traffic but block raw SMTP ports outright. I confirmed this with a direct socket connection test before giving up on the approach, and it’s worth doing the same rather than assuming: ask Claude Code to attempt a bare socket connection to smtp.gmail.com on port 587 and report the exact error before you build anything further on SMTP.
What actually worked: the Gmail API over HTTPS. Same underlying account, different transport. Since it’s a standard HTTPS API call, the same kind the MCP connector already uses successfully, cloud environments allow it without issue.
Setting it up takes five steps:
- Create a Google Cloud project. Go to console.cloud.google.com, create a new project, search for “Gmail API” in the top search bar, and click Enable.
- Set up the OAuth consent screen. In the sidebar, find OAuth consent screen (Google has moved this around, look for “Audience” or “OAuth Overview” if the label’s changed). Choose External as the user type unless this project is tied to a Google Workspace organization. Fill in an app name and your email as both support and developer contact. Add your own email address as a test user, this step is easy to miss and the whole flow fails without it.
- Create OAuth credentials. Go to Credentials, click Create OAuth Client, choose Desktop App as the application type, name it, and create it. Download the resulting JSON file, it contains your client ID and client secret together.
- Run the one-time authorization. Upload that JSON file into your Claude Code session and ask it to generate an OAuth authorization URL requesting only the
gmail.sendscope, nothing broader. Open the URL, sign in, approve access. The page will fail to load afterward at alocalhostaddress, that’s expected. Copy the full URL from your browser’s address bar, including thecode=parameter, and paste it back to Claude Code to complete the exchange. - Store the credentials as environment variables, not a local file. This matters more than it sounds. A refresh token saved only to a file on disk can vanish if your cloud session’s container ever gets recycled for inactivity. Set
GMAIL_REFRESH_TOKEN,GMAIL_CLIENT_ID, andGMAIL_CLIENT_SECRETin your Claude Code environment settings instead, and have the script check environment variables first, falling back to a local file only if they’re missing.
Add an email-sending step using the Gmail API, not the MCP connector or SMTP. Use OAuth with the gmail.send scope only. Read credentials from environment variables (GMAIL_REFRESH_TOKEN, GMAIL_CLIENT_ID, GMAIL_CLIENT_SECRET) first, falling back to a local token file only if those aren't set. Send the HTML report inline in the email body, and also generate a PDF version of the same report to attach. Send to [your recipient list]. Add clear error handling so a failed send prints the reason instead of failing silently.Test this with a real send to yourself before trusting it, and check both the inline body and the PDF attachment render properly on your phone, since that’s likely where you’ll actually read it most mornings.
Step 5: Scheduling It to Run Every Morning, Unattended
Direct answer: Use a Claude Code Routine set to your desired cron time, and explicitly pin it to a named branch and session rather than “the current session,” or you risk the automation quietly drifting onto an incomplete version of your script.
Once everything works in a live test, ask Claude Code to set up a scheduled Routine:
Set up a scheduled Routine that runs every day at 9:00 AM [your timezone]. Each run should: pull yesterday's campaign data via the Meta Ads MCP connector, save it as that day's cache file, run the report script with the send flag using that cache file, and if any step fails, send a short plain-text fallback email explaining what failed and at which step, so a missing report doesn't go unnoticed.Here’s a mistake specific to Claude Code’s cloud environment that cost me an extra hour, and it’s worth knowing about before it happens to you. Every time you open a “fresh session” in Claude Code’s cloud interface, it can spin up a new git branch. I built the Gmail send logic, tested it, confirmed a live email had gone out, and then opened what I thought was a continuation of that work, only to find the new session had no idea the Gmail code existed, because it started from a different branch. The fix was asking Claude Code to list every branch and its commit history, find the one with the working implementation, and merge it forward explicitly.
The lesson: once your automation works, ask Claude Code to confirm and print the exact branch name and session ID the scheduled Routine is bound to, not an implicit reference to “this session.” Pin it explicitly. That one sentence in your setup prompt prevents the entire branch-drift problem.
A daily reporting automation is only as reliable as its weakest dependency. Pinning the scheduled routine to an explicitly named branch and session, and storing credentials as environment variables rather than local files, are what let the automation survive a container restart or a stray new session without silently breaking.
Mistakes I Made (and What I’d Do Differently)
I’m listing these together because seeing them in one place is more useful than finding them scattered through a wall of steps.
The flagging threshold was set too high initially, and every campaign came in under it for weeks worth of testing, meaning the “above/below average” logic never actually fired. Set your threshold from your real daily spend numbers, not a guess.
The 7-day baseline used a simple average of daily ratios at first, which one low-volume outlier day distorted badly. Switch to a spend-weighted baseline from the start.
The “worst ad set” ranking logic treated zero-conversion spend as free, which flagged the wrong creative entirely. Explicitly test your ranking logic against a campaign with real spend and zero results before trusting it.
I assumed Gmail’s MCP connector could send email. It can’t, only draft. Confirm exactly what tools a connector exposes before designing around it.
I assumed SMTP would work from a cloud sandbox. It didn’t, because raw ports get blocked even when HTTPS traffic is fine. Test connectivity directly instead of assuming.
I lost the working Gmail integration once to a branch mismatch between sessions. Pin your scheduled automation to an explicit branch and session, always.
Is This Setup Right for You?
This is worth building if you manage more than one ad account, check performance daily, and are comfortable with a one-time technical setup involving Google Cloud Console. It’s the wrong project if you run a single small account with irregular spend, where a weekly manual check is genuinely faster than building and maintaining this.
It’s also worth being honest about maintenance. OAuth tokens, connector updates, and Claude Code’s own product changes mean this isn’t a “build once, forget forever” system. Budget an occasional 15-minute check, especially in the first couple of weeks, to confirm the numbers still hold up against what you’d see manually.
What is MCP and why does it matter for ad reporting automation?
MCP, or Model Context Protocol, is a standard that lets an AI model like Claude connect directly to external tools such as Meta Ads Manager or Gmail. It matters here because it’s what lets Claude pull real campaign data and send email without you writing custom API integration code from scratch.
Do I need to know how to code to build this?
You need to be comfortable pasting prompts into Claude Code and following setup screens in Google Cloud Console. Claude Code writes the actual Python, you don’t need to write it yourself, but you do need patience for the OAuth setup, which trips up most beginners.
Is Claude Code the same as the Cowork scheduled tasks feature?
No. Cowork scheduled tasks only run while your desktop app is open and your machine is awake. Claude Code’s cloud Routines run on Anthropic’s own infrastructure, independent of your machine’s state, which is why they’re the better fit for an unattended daily report.
Why can’t I just send the report through the Gmail MCP connector directly?
Because the Gmail MCP connector, as currently built, only supports creating drafts, not sending. You’d have to manually open Gmail and click send every morning, which defeats the purpose of automating the report in the first place.
Is this setup actually free?
Yes, in the sense that it doesn’t require a new subscription. You need whatever Claude plan already gives you Claude Code access, and the Meta Ads MCP connector and Gmail API are both free to use. The only cost is your setup time.
What if my Meta Ads MCP connector returns too much data and hits a size limit?
Filter the pull to campaigns with non-zero spend only, which is what the Step 1 prompt does. Accounts with dozens of paused or zero-spend campaigns will otherwise return an unmanageably large response.
How do I know if my “above average” and “below average” flags are actually trustworthy?
Check that the minimum spend threshold matches your real daily campaign spend, not an arbitrary number, and check that campaigns with fewer than about 5 days of trailing history are marked as lower-confidence rather than flagged with full certainty.
Can this same setup work for Google Ads instead of Meta Ads?
The overall architecture, meaning Claude Code, an MCP connector, a calculation script, and the Gmail API, would work the same way if a Google Ads MCP connector is available to you. The specific data fields and account ID format would differ.
Getting This Running for Your Own Accounts
The core lesson from building this wasn’t really about Meta Ads specifically. It was that the failure points are almost never the AI reasoning itself, they’re the connective tissue: an assumption about what a connector can do, a blocked port, a session that forgot which branch it was on. Test each of those assumptions directly instead of assuming they’ll work, and the rest of this build comes together faster than it looks like it should.